Category

Gardening

Category

Start growing your own vegetables is both rewarding and economical. With a bit of creativity and resourcefulness, you can establish a thriving garden without spending a dime. Here are ten practical strategies to help you cultivate a bountiful vegetable garden for free:
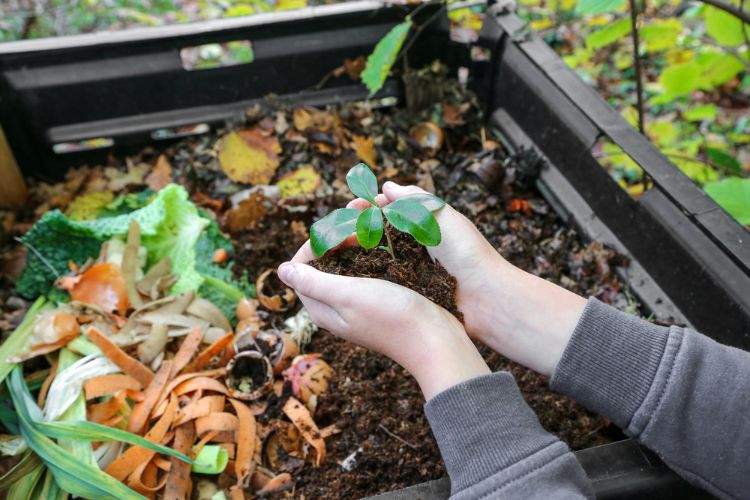
  1. Start Composting

    Transform your kitchen scraps and yard waste into nutrient-rich compost. Utilize a large bucket or storage bin to create a compost system, providing your plants with organic fertilizer while reducing household waste.

  2. Harvest Rainwater

    Set up a rain barrel to collect runoff from your roof. This free water source can be used to irrigate your garden during dry spells, conserving tap water and lowering utility bills.

  3. Limit Gardening Tools

    Avoid unnecessary expenses by starting with essential tools such as a trowel, gardening fork, and pruning shears. These basics are often sufficient for most gardening tasks, and you can often find them second-hand or borrow from friends.

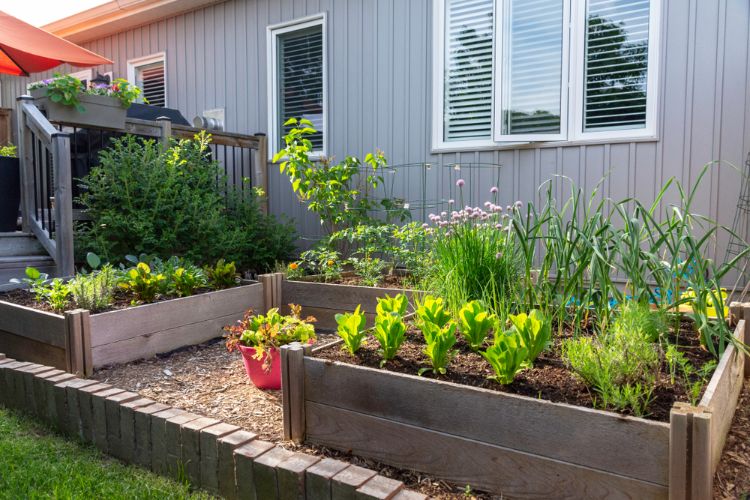
  4. Build Raised Beds from Recycled Materials

    Construct raised garden beds using reclaimed wood from pallets, old furniture, or other discarded materials. This not only saves money but also promotes recycling and sustainability.

  1. Create DIY Seed Starters

    Repurpose household items like egg cartons, toilet paper rolls, or plastic containers to start your seeds indoors. These biodegradable or reusable items make excellent seedling pots.

  2. Source Free Seeds and Plants

    Engage with local gardening communities, seed exchanges, or online groups to obtain free seeds and plant cuttings. Additionally, save seeds from organic produce you consume, such as tomatoes or peppers, to plant in your garden.

  3. Choose Beginner-Friendly Crops

    Opt for vegetables that are easy to grow and maintain, such as tomatoes, peas, cucumbers, and leafy greens. These crops often yield quick results, boosting your confidence as a novice gardener.

  4. Plant Perennial Vegetables and Fruits

    Incorporate perennials like rhubarb, asparagus, or berry bushes into your garden. These plants return each year, reducing the need for replanting and ensuring a continuous harvest.

  5. Regrow from Kitchen Scraps

    Many vegetables can be regrown from scraps. For example, place the base of lettuce or celery in water until roots develop, then transplant it into soil. This method extends the life of your produce and reduces waste.

  6. Utilize Indoor Spaces

If outdoor space is limited, grow herbs and small vegetables indoors on windowsills or balconies. Use containers like plastic bottles or jars to create mini-greenhouses, providing a controlled environment for your plants.

By implementing these cost-effective techniques, you can enjoy the benefits of homegrown produce without straining your budget. Gardening not only yields fresh, flavorful vegetables but also fosters a deeper connection with nature and a sense of accomplishment.

Growing tomatoes at home can be incredibly rewarding, offering fresh, flavorful produce right from your garden. To ensure a plentiful and high-quality harvest, consider these nine essential tips:

  1. Select the Right Variety

    • Research tomato varieties that thrive in your local climate and soil conditions. Consider factors like size, flavor, and growth habits to choose the best fit for your garden.

  2. Optimal Planting Location

    • Tomatoes flourish in warm, sunny spots. Identify areas in your garden that receive consistent direct sunlight throughout the day to promote vigorous growth.

  3. Prepare Nutrient-Rich Soil

    • Before planting, enrich your soil with high-quality compost to ensure it’s nutrient-dense. Proper spacing between plants is also crucial to facilitate healthy development and air circulation.

  4. Deep and Sideways Planting

    • Tomato plants can develop roots along their stems. Planting seedlings deeply or even sideways encourages a robust root system, leading to stronger, more resilient plants.

  5. Provide Adequate Support

    • Even with deep planting, tomato plants benefit from additional support. Utilize fences, walls, or trellises to guide their growth upward, preventing sprawling and reducing disease risk.

  6. Prune Strategically

    • Vining tomato varieties often produce numerous side shoots or “suckers.” Regularly pinching these off helps direct the plant’s energy toward fruit production rather than excessive foliage.

  7. Consistent Watering

    • Tomatoes require regular watering to thrive. Aim to provide 1 to 2 inches of water per week, ensuring the soil remains consistently moist but not waterlogged.

  8. Fertilize Wisely

    • Boost your plants with appropriate fertilizers. Incorporating liquid fertilizer into your watering routine can enhance growth, but be cautious with nitrogen levels, as excessive nitrogen promotes leafy growth over fruiting.

  9. Prevent Disease

    • Protect your crop from common diseases like blight by removing lower leaves and avoiding overhead watering. Ensuring good air circulation and keeping foliage dry can significantly reduce disease incidence.

By implementing these strategies, you can cultivate robust tomato plants and enjoy a rich, flavorful harvest throughout the growing season.

Gardening without full sunlight doesn’t mean you have to give up on homegrown veggies. In fact, some vegetables thrive in partial shade, and a few even prefer it. If your garden gets just 3 to 6 hours of direct sunlight a day, you can still enjoy a successful harvest with the right plant choices. Here are ten vegetables that grow beautifully in shadier spots—and how to make the most of them.

1. Spinach
Spinach loves cool weather and doesn’t need much sun to grow well. A spot with morning light and afternoon shade is perfect. Growing it in lower light can help prevent it from bolting, giving you tender, sweet leaves for longer.

2. Lettuce
Lettuce, especially loose-leaf varieties, is one of the easiest shade-tolerant crops. It grows quickly and can be harvested repeatedly. Shade helps protect it from scorching heat and delays bitterness and bolting.

3. Kale
This hardy green doesn’t mind the shade at all. It can handle cooler temperatures and less light, staying flavorful throughout the season. Plus, its frost tolerance means it can keep producing even into early winter.

4. Arugula
With its peppery punch, arugula thrives in partial shade, which helps maintain its tender texture and bold flavor. It’s a quick grower, perfect for repeat sowings in shady corners of your garden.

5. Beets
Beets grow both roots and greens, and both can develop well in filtered light. While the roots may grow slightly slower, the reduced heat of shadier areas can enhance their earthy sweetness.

6. Radishes
Fast-growing and low-maintenance, radishes are great for shady spots. Too much sun and heat can make them woody or spicy, so a cooler, partially shaded space is ideal for crisp, mild roots.

7. Brussels Sprouts
These cool-weather veggies actually prefer less intense light. They’re slow to mature, but they do well in partial shade, especially in fall gardens where shorter daylight hours are the norm.

8. Turnips
Turnips offer a two-for-one harvest: their leafy tops and their round roots. They grow well with limited light, and shade helps keep both parts tender and tasty.

9. Watercress
This nutrient-dense green loves moisture and shade. While often grown near water, it’s also happy in damp, shaded garden soil. Once established, it produces a steady supply of peppery leaves.

10. Potatoes
Potatoes can handle partial shade, though they may take a bit longer to mature. As long as the soil is loose and well-drained, they’ll reward your patience with a solid underground harvest.

Final Tips for Shady Gardening
Even shade-tolerant vegetables need some light—ideally morning sun or dappled light throughout the day. Make sure your soil is rich and well-drained to support healthy growth, and consider container gardening if your shady space has limited ground access.

Don’t write off those shady areas—embrace them! With the right crops, you can turn overlooked corners into productive garden gold.

Growing peppers can be a rewarding endeavor, yielding vibrant and flavorful additions to your culinary creations. To ensure a bountiful harvest, consider the following essential tips:

  1. Ensure Ample Sunlight
    Peppers thrive in full sun. Select a garden spot that receives six to eight hours of direct sunlight daily to promote robust growth and fruit production.

  2. Plant at the Appropriate Time
    Timing is crucial for peppers. Wait until after the last frost when soil temperatures have warmed to at least 60°F (15°C) before transplanting seedlings outdoors to prevent cold stress.

  3. Provide Adequate Spacing
    Proper spacing ensures good air circulation and reduces disease risk. Space pepper plants 18 to 24 inches apart, depending on the variety, to allow ample room for growth.

  4. Offer Structural Support
    As pepper plants mature and bear fruit, they may require support to prevent branches from bending or breaking. Use stakes or cages to maintain plant integrity and facilitate healthy development.

  5. Prune Strategically
    Early pruning can enhance plant vigor. Remove any flowers that appear before the plant reaches a robust size to encourage energy directed toward vegetative growth, leading to larger yields later.

  6. Nourish with Essential Nutrients
    Peppers benefit from calcium and magnesium to prevent disorders like blossom end rot. Incorporate calcium sources, such as powdered milk, into the soil and consider using Epsom salts to supply magnesium, promoting healthy fruit development.

  7. Exercise Patience During Maturation
    Peppers often take longer to mature compared to other garden vegetables. Maintain consistent care and resist the urge to harvest prematurely; patience will reward you with fully developed, flavorful peppers.

  8. Maintain Weed Control
    Keep the area around pepper plants free from weeds to reduce competition for nutrients and minimize pest habitats. Applying mulch can suppress weed growth and help retain soil moisture.

  9. Manage Pests Proactively
    Monitor plants regularly for signs of pests such as aphids or beetles. Implement integrated pest management strategies, including the use of insecticidal soaps or introducing beneficial insects, to keep pest populations in check.

  10. Fertilize Appropriately
    Begin with nutrient-rich soil and apply a balanced fertilizer before planting. Continue to fertilize during the growing season to support ongoing plant health and optimize fruit production.

By following these guidelines, you can cultivate healthy pepper plants and enjoy a plentiful harvest throughout the growing season.

Container gardening offers a practical solution for those with limited space, allowing the cultivation of a variety of fruits and vegetables in 5-gallon buckets. This method provides control over soil quality, mobility for optimal sunlight exposure, and ease of maintenance. Below is a curated list of top-performing plants suitable for 5-gallon bucket cultivation, along with essential care tips to ensure a bountiful harvest.​

1. Tomatoes

Tomatoes are a quintessential choice for container gardening. Compact or determinate varieties like ‘Patio,’ ‘Tiny Tim,’ and ‘Small Fry’ are particularly well-suited for 5-gallon buckets. Ensure each plant has adequate support through staking or caging, and place the buckets in a location receiving full sunlight. Consistent watering and regular feeding with a balanced fertilizer will promote healthy growth and fruit production.

2. Peppers

Both sweet and chili peppers thrive in container settings. Varieties such as ‘Cayenne,’ ‘Long Red,’ ‘Sweet Banana,’ ‘Wonder,’ and ‘Yolo’ are recommended for bucket cultivation. Plant one pepper plant per 5-gallon bucket, provide ample sunlight, and maintain regular watering schedules to support their development.

3. Cucumbers

Cucumbers adapt well to bucket gardening, especially bush varieties like ‘Bush Pickle’ and ‘Salad Bush.’ Plant one cucumber plant per bucket and provide a trellis or stake for climbing to optimize space and air circulation. Regular watering is crucial, particularly during flowering and fruiting stages.

4. Lettuce

Leafy greens such as lettuce are ideal for shallow containers but can also flourish in 5-gallon buckets. Varieties like ‘Ruby’ and ‘Salad Bowl’ are suitable choices. Sow seeds densely for cut-and-come-again harvesting, ensuring the soil remains consistently moist and the plants receive partial shade during hotter periods.

5. Spinach

Spinach grows well in containers, offering a continuous harvest of nutritious leaves. Ensure the bucket is placed in a spot that receives partial shade, especially in warmer climates, and keep the soil moist to encourage steady growth.

6. Radishes

Radishes are fast-growing root vegetables that are well-suited for bucket gardening. Varieties like ‘Cherry Belle’ and ‘Icicle’ can be sown directly into the bucket, with attention to spacing to prevent overcrowding. Maintain consistent moisture levels for optimal root development.

7. Carrots

Carrots can be successfully grown in buckets, particularly shorter varieties such as ‘Danvers Half Long’ and ‘Short ‘n Sweet.’ Use a loose, well-draining soil mix and ensure the bucket is deep enough to accommodate root growth. Regular watering will help produce crisp, flavorful carrots.

8. Strawberries

Strawberries are well-suited for container gardening, including 5-gallon buckets. Planting multiple strawberry plants per bucket can yield a sweet harvest. Ensure the soil is well-draining and place the bucket in a sunny location. Regular watering and fertilization will support fruit production.

9. Basil

This aromatic herb thrives in buckets and can be harvested continually throughout the growing season. Place the bucket in a sunny spot, water regularly, and pinch back flowers to encourage bushy growth and prolong leaf production.

10. Mint

Mint is a vigorous grower that can overtake garden spaces, making bucket cultivation an excellent way to contain its spread. Position the bucket in partial shade, keep the soil moist, and enjoy fresh mint leaves for culinary and medicinal uses.

11. Parsley

Parsley grows well in buckets, providing a steady supply of flavorful leaves. Place the bucket in a location with full sun to partial shade, water consistently, and harvest leaves regularly to promote new growth.

12. Chives

Chives are easy to grow in containers and offer a mild onion flavor to dishes. Ensure the bucket is in a sunny spot, maintain regular watering, and trim the leaves as needed to encourage continuous production.

13. Blueberries

Dwarf blueberry varieties can be grown in 5-gallon buckets, provided they have acidic, well-draining soil. Place the bucket in full sun, water regularly, and consider mulching to retain moisture and suppress weeds.

14. Green Onions (Scallions)

Green onions are well-suited for bucket gardening and can be regrown from kitchen scraps. Plant the bulbs in well-draining soil, place the bucket in a sunny location, and water consistently for a continuous harvest.

15. Kale

Kale is a nutrient-dense leafy green that grows well in buckets. Choose a sunny to partially shaded location, keep the soil moist, and harvest leaves regularly to encourage new growth.

16. Broccoli

Compact broccoli varieties can be cultivated in 5-gallon buckets. Plant one broccoli plant per bucket, ensure it receives full sun, and maintain consistent watering and fertilization for optimal head development.

17. Beans (Bush Varieties)

Bush beans are suitable for bucket gardening, with varieties like ‘Bush Blue Lake’ and ‘Tendercrop’ being excellent choices. Plant multiple seeds per bucket, provide adequate sunlight, and water regularly to support healthy growth and pod production.

18. Zucchini

Certain zucchini varieties can be grown in buckets, though they require ample space and nutrients. Plant one zucchini plant per bucket, place it in full sun, and ensure regular watering and feeding to support its vigorous growth.

19. Eggplant

Eggplants can thrive in 5-gallon buckets, especially smaller varieties like ‘Black Beauty’ and ‘Ichiban.’ Provide full sun, consistent moisture, and support for the plant as fruits develop.

Integrating natural ingredients like clove, lemon, and onion into daily routines can offer a multitude of health and household benefits. Each component brings unique properties that, when combined, create powerful remedies and solutions for various applications.

Health Benefits

  1. Digestive Support with Clove-Lemon Infusion
    Combining cloves and lemon can aid digestion and support overall gastrointestinal health.

  2. Air Purification Using Clove-Studded Onions
    Placing cloves into a halved onion may help purify indoor air.

  3. Hair Care Enhancement with Clove-Onion Rinse
    A rinse made from cloves and onion can promote scalp health and hair vitality.

Culinary Applications

Incorporating cloves, lemon, and onion into cooking enhances flavor profiles and nutritional value. For instance, adding a clove-studded onion to broths or stews infuses dishes with aromatic warmth, while a squeeze of lemon brightens flavors and adds vitamin C.

Precautions

While these natural ingredients offer numerous benefits, it’s advisable to consult with a healthcare professional before using them for medicinal purposes, especially for individuals with existing health conditions or those taking medications.

Creating a nutrient-dense garden bed is the foundation for healthy, productive plants. When designed correctly, it provides long-lasting fertility, moisture retention, and resilience against drought—minimizing the need for constant upkeep. Whether you’re a first-time gardener or looking to improve your existing garden space, this step-by-step guide will help you build a self-sustaining bed that feeds your plants from the roots up.

Step 1: Choose the Right Location

Start by selecting a spot that receives full sunlight for most of the day and drains well after rain. Clear the area of any grass, weeds, or debris, and level the ground. Dig down about 3 to 4 inches to prepare a shallow base. If you’re using larger logs in your foundation, you may need to dig deeper.

Step 2: Lay Down a Weed Barrier

Line the entire base of your garden bed with overlapping sheets of cardboard. This helps suppress weeds while gradually decomposing into the soil, improving its organic content over time.

Step 3: Create a Layer of Organic Material

Add a thick layer of natural materials such as branches, twigs, and leaves. You can also include raw vegetable scraps and rotting wood if available. This layer will slowly break down over time, enriching the soil and helping retain moisture.

Step 4: Sprinkle Bone Meal for Root Support

Apply a thin layer of bone meal across the organic base. This natural amendment supports strong root development and enhances soil structure as it breaks down.

Step 5: Add Quality Soil

Next, cover the organic matter with a generous amount of rich, well-draining soil. If your native soil lacks structure or nutrients, consider bringing in high-quality topsoil. Make sure the surface is even and smooth to prepare for planting.

Step 6: Apply a Layer of Compost or Aged Manure

Spread a thick layer of fully decomposed compost or well-aged manure over the soil. This layer delivers readily available nutrients and helps stimulate microbial activity, giving your plants an immediate growth boost.

Step 7: Boost with Natural Amendments

For an extra layer of fertility and pest protection, sprinkle neem cake powder and a second light layer of bone meal over the compost. These additions improve soil health and act as a natural defense against soil-borne pests.

Step 8: Allow the Bed to Settle

Let the garden bed rest for 6 to 8 weeks before planting. This gives the materials time to break down and stabilize, ensuring a nutrient-rich and well-balanced environment for your crops. If you prepare the bed in late winter, it will be perfectly timed for spring planting.

Final Tip:

This layered garden bed approach not only promotes consistent growth throughout the season but also minimizes the need for fertilizers and watering. Once established, your garden will thrive with less effort and more reward.

Why Grow Herbs in Water?

Hydroponic herb growing offers several advantages:

  • No soil means no mess and fewer pests
  • Perfect for small spaces like kitchen windowsills
  • Faster growth than soil in many cases
  • Always have fresh herbs within arm’s reach
  • Beautiful living decor for your home

Best Herbs for Water Cultivation

These herbs root particularly well in water:

  • Basil (all varieties)
  • Mint (peppermint, spearmint)
  • Oregano
  • Rosemary
  • Sage
  • Thyme
  • Stevia
  • Lemon balm
  • Tarragon

Note: Annual herbs like cilantro and dill don’t perform as well long-term in water.

Getting Started: What You’ll Need

  • Clean glass jars or bottles (mason jars work perfectly)
  • Fresh herb cuttings (4-6 inch stems)
  • Filtered or spring water
  • Optional: Liquid hydroponic nutrients

Step-by-Step Growing Guide

1. Taking Cuttings

  • Select healthy stems from mature plants
  • Cut just below a leaf node at a 45° angle
  • Remove lower leaves that would sit underwater
  • Use sharp, clean scissors to prevent damage

2. Preparing Your Containers

  • Choose containers that support stems upright
  • Dark glass helps prevent algae growth
  • Clean thoroughly with soap and hot water
  • Fill with enough water to cover nodes (2-3 inches)

3. Rooting Your Herbs

  • Place cuttings in containers
  • Put in bright, indirect light (east-facing window ideal)
  • Change water every 3-5 days
  • Roots should appear in 1-2 weeks

4. Ongoing Care

  • Once rooted, add diluted hydroponic nutrients
  • Refresh water weekly
  • Trim plants regularly to encourage bushiness
  • Watch for algae – clean containers if it appears

Troubleshooting Common Issues

Slow or No Rooting?

  • Try a rooting hormone on the stem
  • Ensure nodes are submerged
  • Provide warmer conditions

Yellowing Leaves?

  • May need nutrients – add hydroponic solution
  • Could be too much direct sunlight

Mold or Slimy Stems?

  • Change water more frequently
  • Clean container with vinegar solution
  • Ensure good air circulation

Harvesting Your Water-Grown Herbs

  • Begin harvesting when plants have several sets of leaves
  • Never take more than 1/3 of the plant at once
  • Snip just above leaf nodes to encourage branching
  • Regular harvesting promotes fuller growth

Creative Display Ideas

  • Use colored glass bottles for decorative effect
  • Arrange multiple jars at different heights
  • Try a wall-mounted test tube holder system
  • Repurpose pretty glassware for an elegant look

Long-Term Success Tips

  • Rotate plants occasionally for even growth
  • Keep away from cold drafts in winter
  • Wipe leaves occasionally to remove dust
  • Consider a small grow light in dark spaces

Final Thoughts

Water-grown herbs offer an incredibly simple way to enjoy fresh flavors year-round. With minimal equipment and care, you can have a constant supply of your favorite culinary herbs right in your kitchen.

Goose grass (also known as cleavers or Galium aparine) is a common weed with surprising health benefits. When prepared as tea, it offers a refreshing, detoxifying drink packed with nutrients. Here’s how to make it properly.

Why Drink Goose Grass Tea?

This humble plant offers several benefits:

  • Natural detoxifier that supports lymphatic drainage
  • Rich in vitamin C and antioxidants
  • May help with urinary tract health
  • Traditionally used to soothe skin conditions
  • Contains silica for hair and nail strength

Harvesting Goose Grass

Best time to pick: Early spring when plants are young and tender (before flowering)
What to look for:

  • Bright green, sticky leaves
  • Square stems with small hooks
  • Grows in shady, moist areas
    Avoid:
  • Plants near roads or sprayed areas
  • Flowering/mature plants (more bitter)

Simple Goose Grass Tea Recipe

Ingredients:

  • 1 cup fresh goose grass (leaves and stems)
  • 4 cups filtered water
  • Optional: honey, lemon, or mint to taste

Preparation Method:

  1. Clean thoroughly: Rinse plants under cool water to remove dirt and insects
  2. Chop roughly: Cut into 1-inch pieces to release more flavor
  3. Cold infusion (best for nutrients):
    • Place herbs in jar
    • Cover with room temperature water
    • Steep 4-8 hours (or overnight)
    • Strain and drink chilled
  4. Hot tea (traditional method):
    • Bring water to near-boil (180°F)
    • Add herbs and steep 5-10 minutes
    • Strain and enjoy warm

Tips for Best Results

  • Drink within 24 hours for maximum benefits
  • Start with small amounts (½ cup) to test tolerance
  • Best consumed in morning or early afternoon
  • Combine with mint or lemon balm for improved flavor
  • Can be frozen in ice cube trays for later use

Possible Side Effects

While generally safe, some people may experience:

  • Mild diuretic effect
  • Allergic reaction (rare)
  • Digestive upset if consumed in excess

Storing Goose Grass

  • Fresh: Keeps 2-3 days in fridge (wrap in damp cloth)
  • Dried: Hang bundles upside down in airy space for 1-2 weeks
  • Frozen: Blanch briefly, then freeze in portions

Final Thoughts

Goose grass tea is an easy way to harness the power of this often-overlooked plant. With its fresh, slightly grassy flavor and numerous health benefits, it’s worth trying as a spring tonic or regular detox drink.

Pruning rose bushes is essential for healthy growth, abundant blooms, and disease prevention. But improper pruning can harm your plants. This easy guide covers when to prune roses and exactly how to do it for stunning results.


Why Pruning Roses Matters

✔ Encourages new growth – More blooms, stronger stems
✔ Improves air circulation – Reduces fungal diseases
✔ Shapes the plant – Prevents overcrowding and legginess
✔ Removes dead/diseased wood – Keeps the plant healthy


Best Time to Prune Roses

1. Most Roses (Hybrid Teas, Floribundas, Grandifloras)

✂ Late winter/early spring (when new buds swell but before leaves open).
✂ Avoid pruning in fall—it can trigger new growth that winter frost will damage.

2. Climbing Roses

✂ After first bloom (early summer) to shape and remove old canes.

3. Old Garden Roses & Once-Blooming Varieties

✂ Prune after flowering (summer) since they bloom on old wood.

4. Repeat-Blooming Shrub Roses

✂ Light pruning in early spring, then deadhead spent blooms.


Tools You’ll Need

  • Sharp bypass pruners (clean cuts, less damage)
  • Loppers (for thick canes)
  • Gloves (thorn-proof!)
  • Disinfectant (rubbing alcohol or bleach solution to sterilize tools)

Step-by-Step Pruning Guide

Step 1: Remove Dead, Damaged, or Diseased Wood

  • Cut back to healthy, green wood.
  • Dispose of diseased clippings (don’t compost).

Step 2: Thin Out Weak Growth

  • Eliminate spindly, crossing, or inward-growing branches.
  • Keep 3-5 strong, outward-facing canes for an open center.

Step 3: Shape the Bush

  • Hybrid Teas: Cut back to 12-18 inches for large blooms.
  • Shrub Roses: Trim lightly to maintain natural form.
  • Climbers: Keep main canes, trim side shoots to 2-3 buds.

Step 4: Make Clean Cuts

  • Cut ¼ inch above an outward-facing bud at a 45-degree angle.
  • Avoid flat cuts—they trap moisture and encourage rot.

Step 5: Clean Up & Feed

  • Remove all clippings to prevent disease.
  • Apply balanced fertilizer or compost to boost new growth.

Common Pruning Mistakes to Avoid

❌ Pruning too early (risk of frost damage).
❌ Using dull or dirty tools (spreads disease).
❌ Over-pruning (stresses the plant).
❌ Leaving stubby cuts (invites pests and rot).


Aftercare Tips

✔ Water deeply after pruning.
✔ Mulch to retain moisture and regulate soil temperature.
✔ Monitor for pests/disease—early treatment is key.


Final Thoughts

Proper pruning transforms your roses—more flowers, healthier plants, and fewer problems. Follow these steps, and your bushes will reward you with spectacular blooms all season long.

Ready to prune? Grab your shears and get started!