Category

Gardening

Category

Embarking on the journey of growing a jackfruit tree from seed has been both rewarding and educational. Here’s a step-by-step guide based on my personal experience:​

1. Selecting and Preparing the Seeds

  • Choosing Fresh Seeds: I began with fresh seeds extracted from a ripe jackfruit, ensuring they were planted within a week to maintain viability.

  • Cleaning and Soaking: After removing any residual fruit flesh to prevent fungal issues, I soaked the seeds in lukewarm water for 24 hours to enhance germination rates.

2. Germinating the Seeds

  • Planting Medium: I prepared a well-draining mix of peat, perlite, and vermiculite in small pots.

  • Planting Depth: Each seed was planted about an inch deep, then watered gently.

  • Creating Humidity: To maintain humidity, I covered the pots with plastic wrap, ensuring regular ventilation to prevent mold growth.

3. Caring for the Seedlings

  • Watering: I kept the soil consistently moist but avoided waterlogging.

  • Lighting: Once sprouts appeared, I moved the seedlings to a location receiving 6-8 hours of direct sunlight daily.

4. Transplanting

  • Timing: When the seedlings developed 2-3 true leaves, I prepared them for transplanting.

  • Container Selection: For container growth, I chose large pots with adequate drainage to accommodate the tree’s extensive root system.

5. Ongoing Care

  • Mulching: Applying mulch around the base helped retain soil moisture and regulate temperature.

  • Fertilization: I used a balanced, slow-release fertilizer during the growing season to support healthy development.

  • Pruning: Regular pruning maintained the tree’s shape and removed any dead or diseased branches.

Bay leaves have long been esteemed in culinary traditions for their distinctive aroma and flavor. Beyond their kitchen applications, some cultures have embraced the practice of burning bay leaves, attributing various benefits to this ritual. While anecdotal accounts suggest several advantages, it’s essential to approach these claims with a balanced perspective, considering both traditional beliefs and scientific insights.

1. Aromatherapy and Relaxation

Burning bay leaves releases a fragrant smoke that many find calming. This practice is believed to reduce stress and promote relaxation. However, scientific evidence supporting these effects is limited. A 2021 study on rats indicated potential cognitive benefits from inhaling compounds found in bay leaves, but further research is needed to confirm these effects in humans.

2. Respiratory Considerations

Some suggest that inhaling the smoke from burning bay leaves can alleviate respiratory issues. However, health professionals generally advise against inhaling smoke from any source due to potential risks, including lung irritation and oxidative stress. Alternative methods, such as using bay leaf essential oils in a diffuser, may offer a safer way to experience the plant’s aroma.

3. Natural Insect Repellent

The scent produced by burning bay leaves is traditionally believed to deter insects like mosquitoes and flies. While bay leaves contain compounds with insect-repelling properties, the effectiveness of this method in practical settings remains uncertain. Using bay leaves as a pantry deterrent for pests is a more commonly accepted practice.

4. Mental Clarity and Focus

Some individuals report enhanced mental clarity and concentration when burning bay leaves. These claims are largely anecdotal, and scientific research has yet to substantiate such cognitive benefits in humans.

5. Spiritual and Ritualistic Practices

Burning bay leaves holds cultural and spiritual significance in various traditions, symbolizing purification and the dispelling of negative energy. While these practices are meaningful within specific cultural contexts, they are subjective and not grounded in scientific evidence.

6. Air Freshening Properties

The aromatic smoke from burning bay leaves can mask unpleasant odors, serving as a natural air freshener. However, it’s important to consider ventilation and potential respiratory sensitivities when using smoke for this purpose.

Safety Considerations

If you choose to burn bay leaves, prioritize safety:

  • Ventilation: Ensure the area is well-ventilated to minimize smoke inhalation.

  • Supervision: Never leave burning leaves unattended.

  • Health Conditions: Individuals with respiratory issues should consult a healthcare professional before exposure to any form of smoke.

While burning bay leaves is a practice rooted in tradition with various attributed benefits, it’s crucial to approach it with caution and be aware of the limited scientific evidence supporting these claims. Exploring alternative methods, such as using bay leaf essential oils, may provide a safer way to experience the potential advantages associated with this plant.

In my quest to optimize my garden space and improve my cucumber harvest, I experimented with planting cucumbers in a herringbone pattern. This method, known for its space efficiency and enhanced plant health benefits, intrigued me. Here’s a step-by-step guide based on my experience:​

1. Planning the Garden Layout

  • Choosing the Location: I selected a sunny spot in my garden, as cucumbers thrive with ample sunlight.

  • Soil Preparation: I ensured the soil was rich, well-draining, and had a neutral pH. Adding compost provided the necessary nutrients for healthy growth.

2. Setting Up the Herringbone Structure

  • Materials Needed: Sturdy stakes (such as bamboo) and garden twine or netting.

  • Constructing the Pattern:

    • I placed two parallel rows of stakes about 18 inches apart.

    • Angling the stakes to intersect at the top formed a series of ‘X’ shapes along the rows.

    • Securing the intersections with twine provided stability.

    • Connecting the stakes with additional twine or netting offered support for the climbing vines.

3. Planting and Training the Cucumbers

  • Sowing Seeds: I planted cucumber seeds at the base of each stake, ensuring consistent moisture during germination.

  • Guiding the Vines: As the plants grew, I gently trained the vines to climb the stakes, using soft ties to secure them. Regular pruning of lateral branches improved air circulation and directed energy towards fruit production.

4. Ongoing Care

  • Watering: Maintaining consistent soil moisture was crucial, especially during flowering and fruiting stages.

  • Fertilizing: Applying a balanced fertilizer every few weeks supported vigorous growth.

  • Pest and Disease Management: Regular monitoring allowed for early detection of issues, and I used organic treatments like neem oil when necessary.

5. Harvesting

  • Timing: I harvested cucumbers when they reached medium size and had a firm texture, which encouraged continuous production.

  • Method: Using a sharp knife to cut the cucumbers from the vine prevented damage to the plant.

Embarking on the journey of growing an almond tree from seed has been both rewarding and educational. Here’s a step-by-step guide based on my experience:​

1. Selecting and Preparing Almond Seeds

  • Choosing Seeds: I opted for raw, unprocessed almonds, ensuring they were free from roasting or chemical treatments.

  • Stratification Process: To simulate winter conditions and encourage germination, I soaked the almonds in water for 48 hours. Afterward, I wrapped them in a moist paper towel, placed them inside a plastic bag, and refrigerated them for several weeks.

2. Planting the Seeds

  • Timing: Spring proved to be the ideal season for planting.

  • Soil Preparation: I prepared well-draining soil with a pH between 6 and 7.5, enriching it with compost for added nutrients.

  • Planting Depth: Each seed was planted 2-3 inches deep, followed by thorough watering.

  • Sunlight Exposure: Choosing a sunny location was crucial, as almond trees thrive with ample sunlight.

3. Nurturing the Seedling

  • Watering: Consistent watering during the tree’s early stages promoted healthy growth.

  • Pruning: I focused on developing a strong framework by pruning in the initial years and later encouraged sunlight penetration and air circulation to minimize disease risk.

  • Fertilization: Applying a balanced fertilizer during the growing season supported robust development.

4. Protecting the Young Tree

  • Pest and Disease Management: Regular monitoring helped in early detection and management of common pests like aphids and potential fungal infections.

  • Winter Care: In harsher climates, I used mulch and protective wraps to shield the young tree from extreme cold.

5. Anticipating the Harvest

  • Patience Required: Understanding that almond trees typically begin producing nuts in their 3rd or 4th year, with full production after 5-6 years, helped set realistic expectations.

  • Harvest Indicators: I looked for splitting hulls revealing the shells as a sign of readiness, usually in late summer to early fall.

  • Post-Harvest Care: After harvesting, I allowed the almonds to dry in a cool, dry place for about a week before storage.

Dealing with persistent joint pain, especially in the hands, led me to explore natural remedies. I discovered that bay leaves, commonly used in cooking, possess anti-inflammatory and pain-relieving properties. Intrigued, I decided to try a simple method involving fresh bay leaves to alleviate my discomfort. Here’s the approach I took:​

Using Bay Leaves for Joint Pain Relief

Ingredients:

  • 3 fresh bay leaves

  • A glove or plastic wrap

  • Optional: A small amount of natural oil (like coconut or olive oil)

Method:

  1. Select Fresh Bay Leaves: I chose three clean, fresh bay leaves, ensuring they were free from contaminants.

  2. Prepare the Affected Area: I washed and dried the painful area of my hand thoroughly.

  3. Apply the Bay Leaves: I placed the bay leaves directly onto the aching joints.

  4. Secure the Leaves: Using a glove, I held the leaves in place to maintain contact with my skin.

  5. Duration: I left the leaves on for about four hours to allow their properties to work.

  6. Repeat as Needed: I repeated this process daily for a week, noting a gradual reduction in pain.

I recently discovered that aspirin, the same pill we take for headaches, can work wonders in the vegetable garden. By introducing aspirin to my plants, I noticed improved growth, stronger immunity, and even higher yields. Here’s how you can use aspirin to boost your garden’s health:​

1. Enhancing Seed Germination

Soaking seeds in an aspirin solution before planting can lead to faster and more robust sprouting.

  • How to Use: Dissolve one aspirin tablet in a liter of water and soak the seeds for about 12 hours before planting.

2. Strengthening Plant Immunity

Applying an aspirin solution to plants can bolster their natural defenses against diseases and pests.

  • How to Use: Mix four aspirin tablets in four liters of water and spray the solution on the plants every two to three weeks.

3. Promoting Root Development in Cuttings

Aspirin can stimulate root growth in plant cuttings, leading to healthier new plants.

  • How to Use: Dissolve one aspirin tablet in a liter of distilled water and soak the cuttings for one to two hours before planting.

4. Boosting Overall Growth and Yield

Regular aspirin treatments can result in taller plants with more foliage and increased fruit or vegetable production.

  • How to Use: Use the foliar spray method (four tablets in four liters of water) every few weeks throughout the growing season.

5. Soil Amendment for Continuous Benefits

Placing aspirin directly into the soil can provide ongoing advantages for plant health.

  • How to Use: Insert one aspirin tablet into the soil near the base of each plant and water thoroughly to help it dissolve.

Crabgrass, often dismissed as an invasive lawn nuisance, actually harbors a range of health benefits that are largely overlooked. This resilient plant has been utilized in traditional medicine for various therapeutic purposes. Here’s how crabgrass can contribute to your well-being:​

Health Benefits of Crabgrass

  1. Anti-Inflammatory Properties: Crabgrass contains compounds that may help reduce inflammation, potentially alleviating discomfort associated with conditions like arthritis and muscle soreness.

  2. Digestive Support: Traditionally, crabgrass has been used to aid digestion and may help relieve issues such as bloating and indigestion.

  3. Kidney Health: Acting as a natural diuretic, crabgrass can promote increased urine production, assisting in flushing out toxins and supporting kidney function.

  4. Respiratory Relief: Some traditional remedies utilize crabgrass to support respiratory health, potentially easing symptoms of colds and minor respiratory discomforts.

  5. Skin Soothing Effects: When applied topically, preparations made from crabgrass have been used to soothe minor skin irritations, insect bites, and rashes.

Incorporating Crabgrass into Your Routine

Crabgrass can be consumed in various forms, such as herbal teas or poultices. For example, brewing a tea from its leaves and stems is a common method to harness its potential benefits. However, it’s essential to ensure that any crabgrass used is free from pesticides and contaminants.

Combining cloves, lemon, and onion creates a potent blend that offers numerous health benefits and practical uses around the home. Here’s how this natural trio can enhance your well-being and daily life:​

Health Benefits

  1. Immune Support: Lemons are rich in vitamin C, which boosts the immune system, while cloves contain antioxidants that combat oxidative stress.

  2. Digestive Aid: Onions provide prebiotics that support gut health, and cloves have been traditionally used to alleviate digestive discomfort.

  3. Anti-Inflammatory Properties: The compounds in cloves and onions possess anti-inflammatory effects, which may help reduce inflammation in the body.

Home Uses

  • Natural Air Freshener: Piercing a lemon with cloves creates a fragrant air freshener that also acts as an insect repellent.

  • Air Purification: Placing sliced onions around the home is believed to purify the air by absorbing bacteria and viruses.

Culinary Applications

Incorporating cloves, lemon, and onion into your cooking can enhance the flavor profile of various dishes. For example, adding a clove-studded onion to soups or stews imparts a warm, aromatic depth, while a squeeze of lemon brightens the overall taste.

Growing avocados in containers might seem ambitious, but with the right care and setup, it’s completely doable—even if you don’t live in a tropical climate. Whether you’re starting from seed or using a young tree, this guide will walk you through how to grow a healthy avocado plant in a pot and eventually enjoy your own homegrown fruit.

  1. Germinate the seed

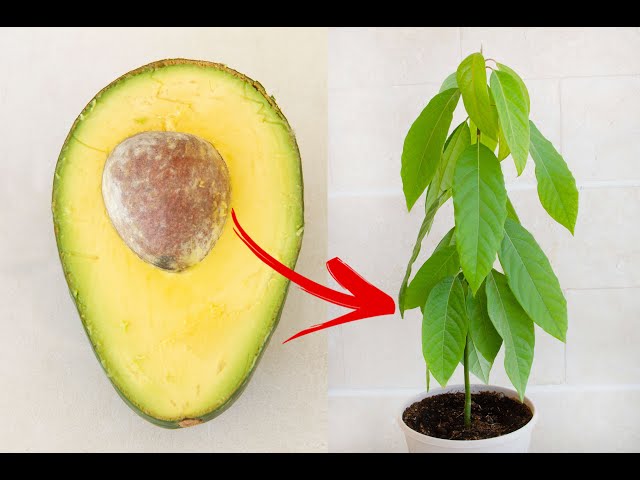
Start by removing the seed from a ripe avocado. Rinse it well, then suspend it over a glass of water using four toothpicks so that only the bottom sits in water. Set it in a warm, bright place and change the water weekly.

After 2 to 4 weeks, you should see roots and a sprout emerging from the top.

  1. Choose the right container

Once your sprouted seed has a few inches of growth, transfer it to a pot at least 10–12 inches wide with drainage holes. Avocados hate soggy roots, so good drainage is essential.

Use a mix of potting soil and perlite or sand to keep it loose and well-draining.

  1. Give it warmth and light

Avocados love the sun. Place your potted tree in a bright spot that gets 6–8 hours of light daily. If you live in a cooler area, bring the pot indoors when temps drop below 50°F (10°C).

  1. Water just enough

Keep the soil moist but never soggy. Let the top inch dry out between waterings. Overwatering is one of the biggest mistakes new avocado growers make.

  1. Feed and prune

Feed with a balanced fertilizer during spring and summer. You can also use compost or worm castings for a gentle, organic boost.

When the plant reaches about 24 inches tall, pinch the top leaves to encourage side branches. This makes the plant fuller and more productive over time.

  1. Be patient

Growing avocados from seed can take 3–5 years (or more) to bear fruit, and not all will produce. For faster results, start with a grafted avocado tree from a nursery—it’s already set up to produce fruit and can start within 1–2 years under the right conditions.

With patience and a little care, growing avocados in pots is not only possible—it’s incredibly satisfying. Whether or not you get fruit, you’ll still have a beautiful, lush tree that adds life to your home or patio. And if it does bear fruit? Even better.

Want to grow fresh food even when it’s freezing outside? An underground greenhouse—also known as a walipini—makes that possible. It uses the earth’s natural insulation to trap heat and create a stable growing environment, even in winter.

If you’ve got a little space and a big love for gardening, this DIY project could turn your backyard into a year-round harvest zone. Here’s how to get started.

What is an underground greenhouse?

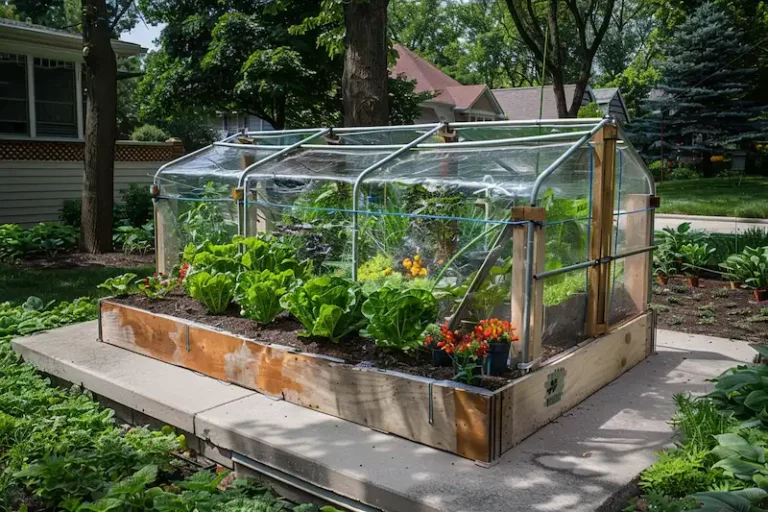
An underground greenhouse is a sunken structure that uses the warmth of the earth and passive solar heating to maintain a consistent temperature. It’s typically dug 4 to 6 feet into the ground, with a transparent roof angled to the sun. It protects plants from frost, wind, and temperature swings.

Why build one?

  • Lets you grow fresh produce all year, even in cold climates

  • Uses less energy than heated greenhouses

  • Protects crops from harsh weather and pests

  • Cuts down on grocery bills

  • Built right, it can last for decades

Where to build it

Choose a spot with full sun exposure—ideally facing north-south to catch maximum light in winter. A natural slope or hillside makes the digging easier, but you can also build it on flat ground.

Basic design elements

  • Depth: Dig down about 6 feet or more, depending on your climate

  • Roof angle: Use a slanted roof made from clear plastic, polycarbonate, or greenhouse film

  • Back wall: Can be packed earth, stone, or insulated to reflect heat back inside

  • Front wall: Should be low to allow maximum sunlight through the angled roof

  • Ventilation: Add vents or a solar fan to control humidity and prevent overheating on sunny days

  • Drainage: Make sure the base has a slight slope and gravel or drain pipe to prevent flooding

Materials you’ll need

  • Shovels or digging equipment

  • Lumber or masonry for framing

  • Clear polycarbonate or greenhouse plastic

  • Rebar or supports for the roof structure

  • Insulation (optional, for colder regions)

  • Vents or windows for airflow

  • Gravel or sand for the base

Tips for success

  • If your soil is heavy or clay, reinforce the walls to prevent collapse

  • Use thermal mass (like barrels of water or bricks) to absorb and release heat at night

  • Add raised beds for easier access and better drainage

  • Watch for moisture buildup—ventilation is key

  • You can plant in-ground or use containers depending on your setup

What you can grow year-round

Cool-season greens like spinach, lettuce, kale, and Swiss chard thrive in underground greenhouses. Root veggies like carrots and beets also do well. In spring and summer, you can grow everything from tomatoes and peppers to herbs and melons.

An underground greenhouse gives you total control over your growing space, no matter the weather outside. It takes some effort to build, but once it’s set up, the payoff is huge. Fresh food in January? Yes, please.